Server
!!! note "备忘记录一些实验室服务器和云服务器的操作,以 linux 为主"
最常用指令
export HF_ENDPOINT=https://hf-mirror.comwget -qO- https://astral.sh/uv/install.sh | shexport UV_DEFAULT_INDEX="https://mirrors.aliyun.com/pypi/simple"source /etc/network_turbounset http_proxy && unset https_proxy && unset all_proxyzsh 配置
sudo apt install zsh
chsh -s /bin/zshsh -c "$(curl -fsSL https://raw.githubusercontent.com/ohmyzsh/ohmyzsh/master/tools/install.sh)"apt-get install autojumpgit clone https://github.com/zsh-users/zsh-autosuggestions ~/.oh-my-zsh/custom/plugins/zsh-autosuggestions
git clone https://github.com/zsh-users/zsh-syntax-highlighting ~/.oh-my-zsh/custom/plugins/zsh-syntax-highlighting
git clone --depth=1 https://gitee.com/romkatv/powerlevel10k.git "${ZSH_CUSTOM:-$HOME/.oh-my-zsh/custom}/themes/powerlevel10k"git clone https://gh-proxy.org/https://github.com/zsh-users/zsh-autosuggestions ~/.oh-my-zsh/custom/plugins/zsh-autosuggestions
git clone https://gh-proxy.org/https://github.com/zsh-users/zsh-syntax-highlighting ~/.oh-my-zsh/custom/plugins/zsh-syntax-highlighting
git clone --depth=1 https://gitee.com/romkatv/powerlevel10k.git "${ZSH_CUSTOM:-$HOME/.oh-my-zsh/custom}/themes/powerlevel10k"plugins=(
git
zsh-syntax-highlighting
autojump
zsh-autosuggestions
)Open ~/.zshrc
ZSH_THEME="powerlevel10k/powerlevel10k"AutoDL
export HF_HOME=/root/autodl-tmp/.huggingface/
export HF_ENDPOINT=https://hf-mirror.com
source /root/autodl-tmp/src/.venv/bin/activate清理缓存
以下两个是可以直接删除,不影响系统运行的目录,所以首先直接删除。如果未能释放空间,继续查看下文
du -sh /root/miniconda3/pkgs/ && rm -rf /root/miniconda3/pkgs/*      # conda 的历史包
du -sh /root/.local/share/Trash && rm -rf /root/.local/share/Trash # jupyterlab 的回收站以下目录是可能占用较大空间,但需要您根据实际情况清理的目录:
du -sh /tmp/         #查看/tmp 占用的空间大小
du -sh /root/.cache #查看/root/.cache 占用的空间大小网络加速
source /etc/network_turbounset http_proxy && unset https_proxyhuggingface
Hugging Face Forums - Hugging Face Community Discussion
科学上网,访问该网址 通过全局代理的方式,实现模型的下载。
使用镜像网址 国内 huggingface 镜像地址:https://hf-mirror.com/ 往下翻,直接可看到使用教程。主要有四种解决方式。最直接的方式就是一个个下载使用。
在代码中增加设置 import os os.environ['HF_ENDPOINT'] = 'https://hf-mirror.com'
Llama 模型申请
搜索并选择模型
- 填写信息申请使用,不要写亚洲国家
查看申请状态
- 点击头像,进入 "Settings"
- 左侧菜单选择 "Gated Repositories"
- 查看申请状态,状态变为 ACCEPTED 即表示通过
- 通常审批时间在半小时左右
获取 Access Token
- 在 "Settings" 页面,点击左侧的 "Access Tokens"
- 点击 "Create new token" 按钮
- Read 权限
export HF_TOKEN=your_huggingface_token模型下载
=== "方法 1 huggingface-cli"
export HF_ENDPOINT=https://hf-mirror.com
huggingface-cli download --resume-download <model_name> --local-dir <path>=== "方法 2 hf download"
```shell
pip install -U "huggingface_hub[cli]
```
```shell
hf download <model_name>
```
=== "方法 3 git-lfs"
```shell
apt install git-lfs -y
git lfs install
cd <folder_path>
git clone https://huggingface.co/<model_name>
```
=== "方法 4 在代码头部加入"
import subprocess
import os

result = subprocess.run('bash -c "source /etc/network_turbo && env | grep proxy"', shell=True, capture_output=True, text=True)
output = result.stdout
for line in output.splitlines():
   if '=' in line:
      var, value = line.split('=', 1)
os.environ[var] = value使用 modelscope 下载
pip install modelscopemodelscope download <model_name> --local_dir ./dirmodelscope download Qwen/Qwen2.5-VL-7B-Instruct --local_dir ./LLMs/Qwen2.5-VL-7B-Instruct
登录
ssh name@ipssh -p <port> name@ipexit免密登录
cd .sshssh-keygen -t rsa会在.ssh目录下生成id_rsa.pub和 id_rsa两个文件
ssh-copy-id -p 10086 name@ip会在服务器端的.ssh目录下有authorized_keys文件,和id_rsa.pub的内容是一样的
ssh <alias>!!! note "免密登录的操作是针对用户的,切换其他用户就不可以了" 可以结合公私钥文件进行理解
任务运行
使用 nohup 后台运行任务
nohup 命令用于以忽略挂起信号的方式运行另一个命令。这在后台运行进程时特别有用,即使终端会话关闭,进程仍然会继续运行。
使用
nohup运行命令:要使用
nohup在后台运行命令,可以使用以下语法:bashnohup command &command: 您要运行的命令。&: 这个符号用于在后台运行命令。
输出重定向:
默认情况下,
nohup将输出重定向到当前目录中的一个名为nohup.out的文件。如果您想为输出指定一个不同的文件,可以使用:bashnohup command > output.log 2>&1 &> output.log: 将标准输出重定向到output.log。2>&1: 将标准错误重定向到与标准输出相同的文件。
检查正在运行的进程:
要检查正在运行的后台进程列表,可以使用:
bashjobs将后台进程带到前台:
如果需要将后台进程带到前台,请使用:
bashfg %job_number%job_number: 进程的作业号,可以使用jobs命令找到。
终止后台进程:
要终止后台进程,可以使用带有进程 ID (PID) 的
kill命令:bashkill -9 PIDPID: 您要终止的任务的进程 ID。
使用 Screen 持续运行任务
远程神器 screen 命令的保姆级详解教程 + 举例-CSDN 博客
- 安装 Screen
sudo apt-get install screen增
screen -S <name><name>可以设置为ssh、ftp等,用于标识该 Screen 窗口的用途。
改
Ctrl-a A查
screen -ls窗口管理
分离窗口:按
CTRL-a然后按d,可以退出 SSH 登录而不影响 Screen 程序的执行。关闭当前窗口:
bashCtrl-a k新建子窗口:
bashCtrl-a c #在当前的会话下面生成一个新的窗口并切换过去列出所有子窗口:
bashCtrl-a w #列出当前窗口如果只有一个 Screen 进程:
bashscreen -r -d如果有多个 Screen 进程,通过 PID 进入:
bashscreen -r -d <PID>示例:
bashscreen -r -d 1805
删
- 完全退出:
exit(不会保存 session)。
方法一:在 Screen 会话内终止
先重新连接到要终止的 Screen 会话:
bashscreen -r <PID>在会话内输入
exit或按Ctrl+d来终止会话。
方法二:直接从外部终止
bashscreen -X -S <PID> quit或
bashscreen -X -S <session_name> quit这会直接终止指定的 Screen 会话,无需先连接到会话。
清理会话
screen -wipe #清理那些dead的会话远程神器 screen 命令的保姆级详解教程 + 举例-CSDN 博客
网络
换源
反向代理
本地执行 SSH 反向端口转发
shellssh -R 1080:127.0.0.1:7890 root@10.13.21.42 -p 48128-R 1080:127.0.0.1:7890→ 把远程服务器的127.0.0.1:1080映射到你本地的127.0.0.1:7890连上以后,你在远程服务器上可以看到本地代理被映射到远程的
127.0.0.1:1080远程服务器设置代理变量
shellexport http_proxy=http://127.0.0.1:1080 export https_proxy=http://127.0.0.1:1080 export all_proxy=socks5://127.0.0.1:1080测试
shellcurl -I https://www.google.com
内网穿透
公网:人人都可以访问
内网:需要特定的网络才可以访问
内网穿透就是将内网的服务暴露给公网访问
=== "Server 端配置"
下载安装包
tar -zxvf frp_0.61.2_linux_amd64.tar.gzcd frp_0.61.2_linux_amd64vim frps.tomlbindPort = 7000 # 服务端与客户端通信端口
# vhostHTTPPort = 80 # 如果客户端需要使用 http 服务,在这里配置代理端口
auth.token = "token" # 身份验证令牌,frpc 要与 frps 一致
# Server Dashboard,可以查看 frp 服务状态以及统计信息
webServer.addr = "0.0.0.0" # 后台管理地址
webServer.port = 7500 # 后台管理端口
webServer.user = "admin" # 后台登录用户名
webServer.password = "admin" # 后台登录密码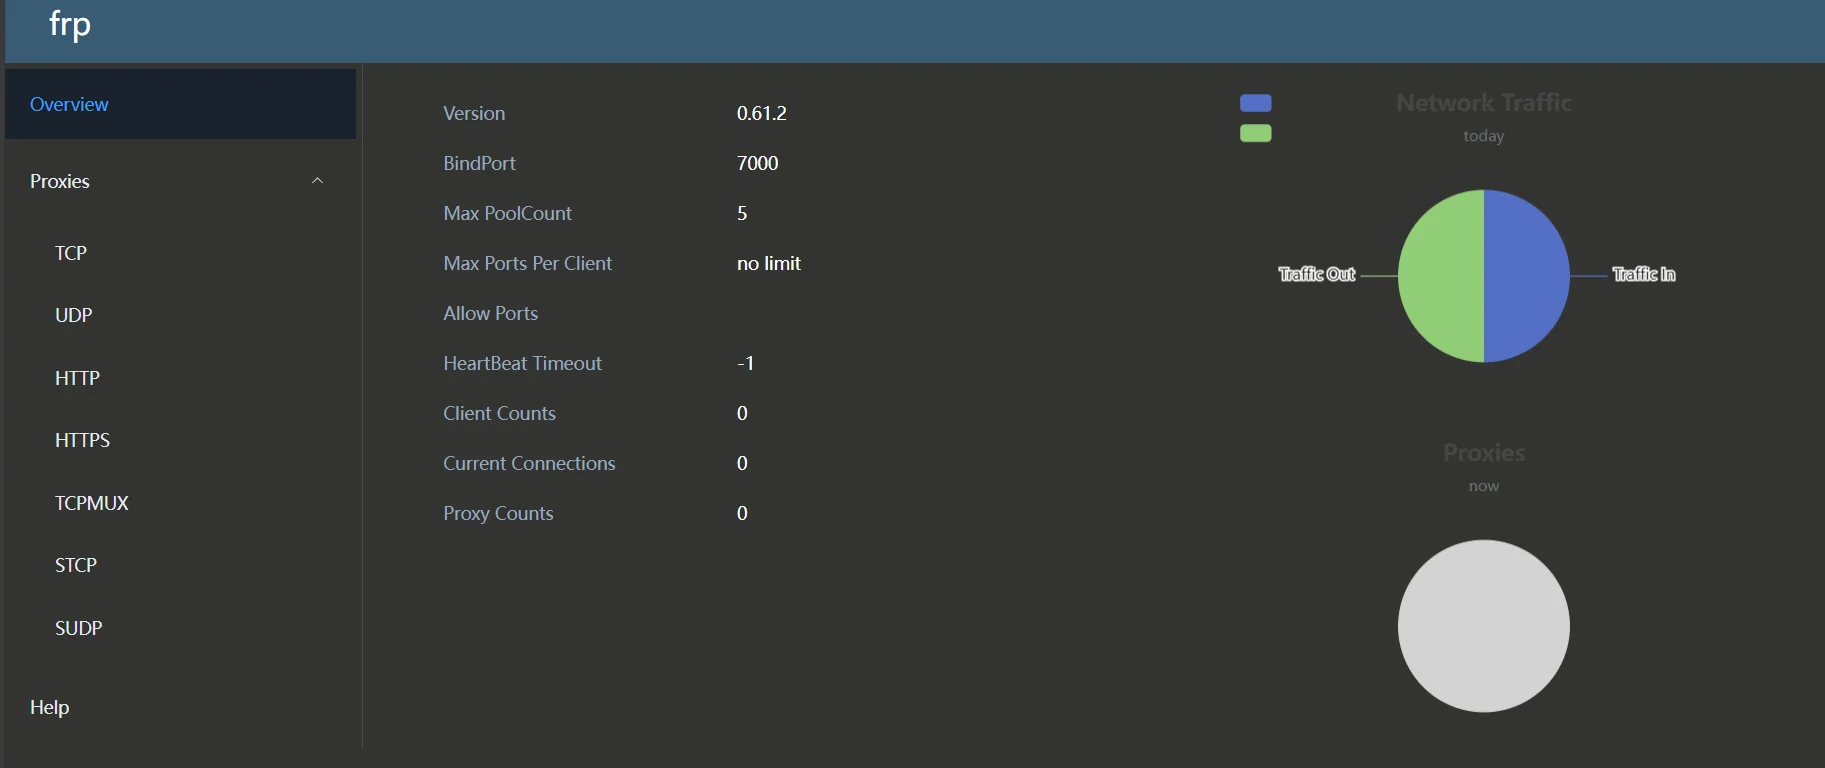
访问公网 ip 的 7500 端口,可以查看 frp 服务状态以及统计信息
!!! note "注意这里需要在 aliyun 控制台的安全组中添加 7000 和 7500 端口" shell title="开放服务端端口" sudo ufw allow 7000/tcp # FRP主端口 sudo ufw allow 7500/tcp # 仪表盘 sudo ufw allow 40443/tcp # HTTP穿透 sudo ufw allow 40800/tcp # HTTPS穿透
#服务器端
nohup ./frps -c frps.toml &=== "Client 端配置"
接下来配置客户端侧(frpc = frp client)
#客户端
nohup ./frpc -c frpc.toml &sudo vi /etc/rc.local
#自行修改为绝对路径
nohup /root/frp/frpc -c /root/frp/frpc.toml &[common]
server_addr = <server_ip>
server_port = 7000 # 服务端 bind_port
auth.token = "your_secure_token_here"
# ----------- TCP 穿透示例(SSH 服务)------------
[ssh]
type = tcp
local_ip = 127.0.0.1
local_port = 22
remote_port = 6000!!! note "特别注意,字符串要加双引号,数字和 ip 不要加双引号,尽量不要写注释"
./frpc -c frpc.ini这个时候,服务端应该会收到客户端的连接请求,可以看到类似如下信息
sudo netstat -tulnp | grep ':6000'ssh -p 6000 <client_username>@<server_ip>要特别注意这里是 client 的 username,而不是 server 的 username
这个时候应该就可以配置成功了
sudo firewall-cmd --zone=public --add-port=7000/tcp --permanent
sudo firewall-cmd --zone=public --add-port=7500/tcp --permanent
sudo firewall-cmd --zone=public --add-port=6000/tcp --permanent

sudo firewall-cmd --reload!!! note "如果报错了试着使用 su 权限运行一下,说不定可以"
| 场景 | 代理类型 | 本地端口 | 远程端口 | 用途 |
|---|---|---|---|---|
| 远程 SSH 访问 | TCP | 22 | 6000 | 远程 SSH 进内网服务器 |
| 内网 Web 服务器访问 | HTTP | 8080 | 8081 | 访问本地网站 |
| 访问家中 NAS / 服务器 | TCP | 445/5005 | 4445/5055 | 远程访问 SMB 或 WebDAV |
| 远程数据库访问 | TCP | 3306/5432 | 13306/15432 | 远程连接 MySQL / PostgreSQL |
| 远程桌面(RDP) | TCP | 3389 | 13389 | 远程控制 Windows |
| 远程管理 Docker API | TCP | 2375 | 12375 | 远程管理 Docker |
远程连接
pycharm 远程开发
Pycharm 远程连接服务器并运行代码(详细!)_pycharm 将代码同步到远程服务器-CSDN 博客
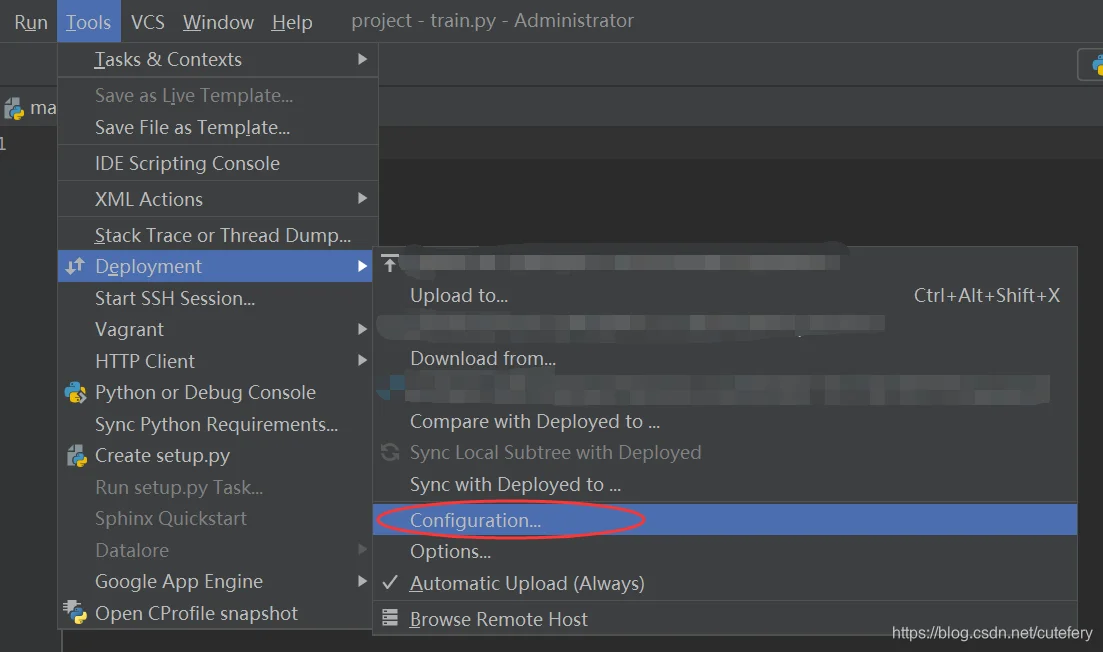
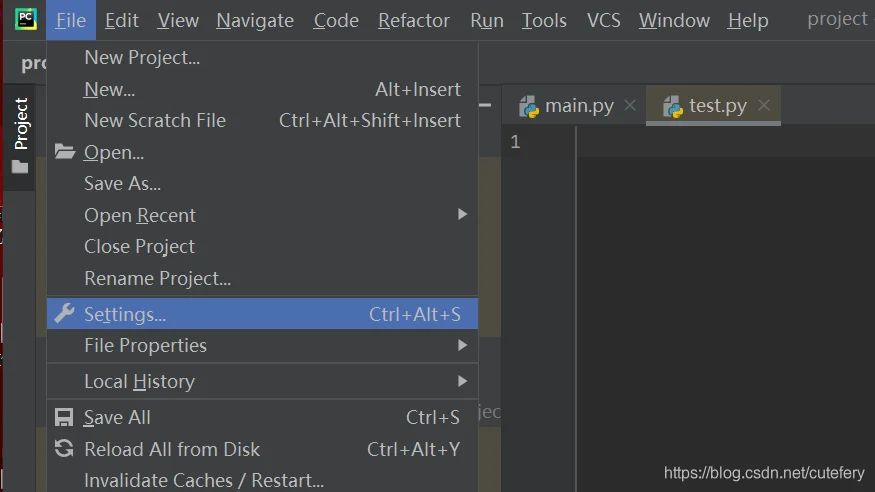
1. 设置 Connection
Tools->Deployment->Configuration
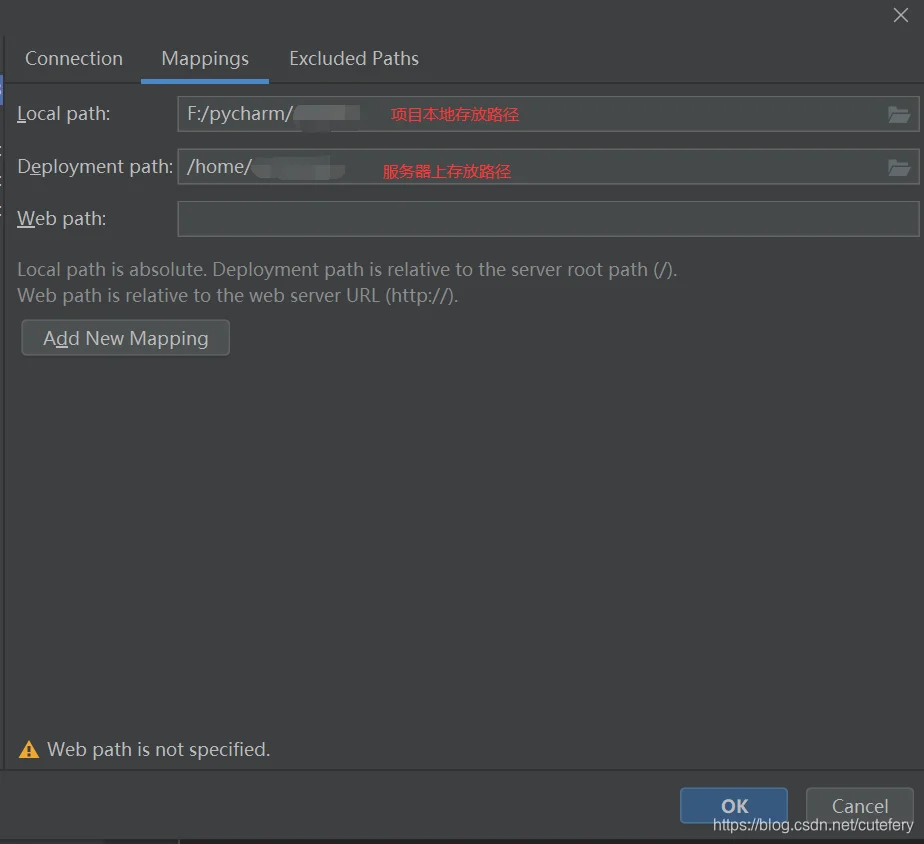
2. 建立 Mapping
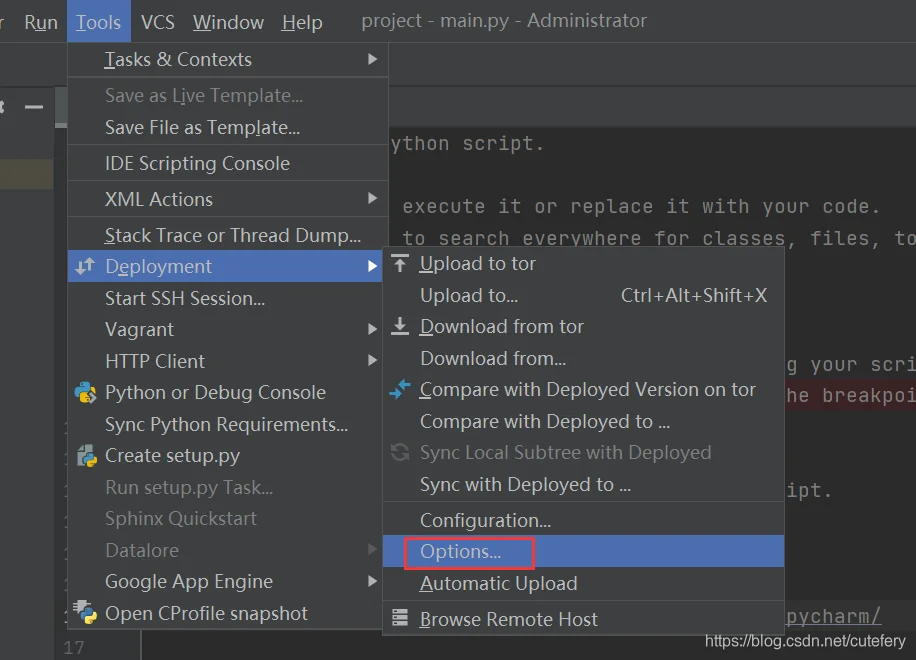
3. 实现代码自动上传
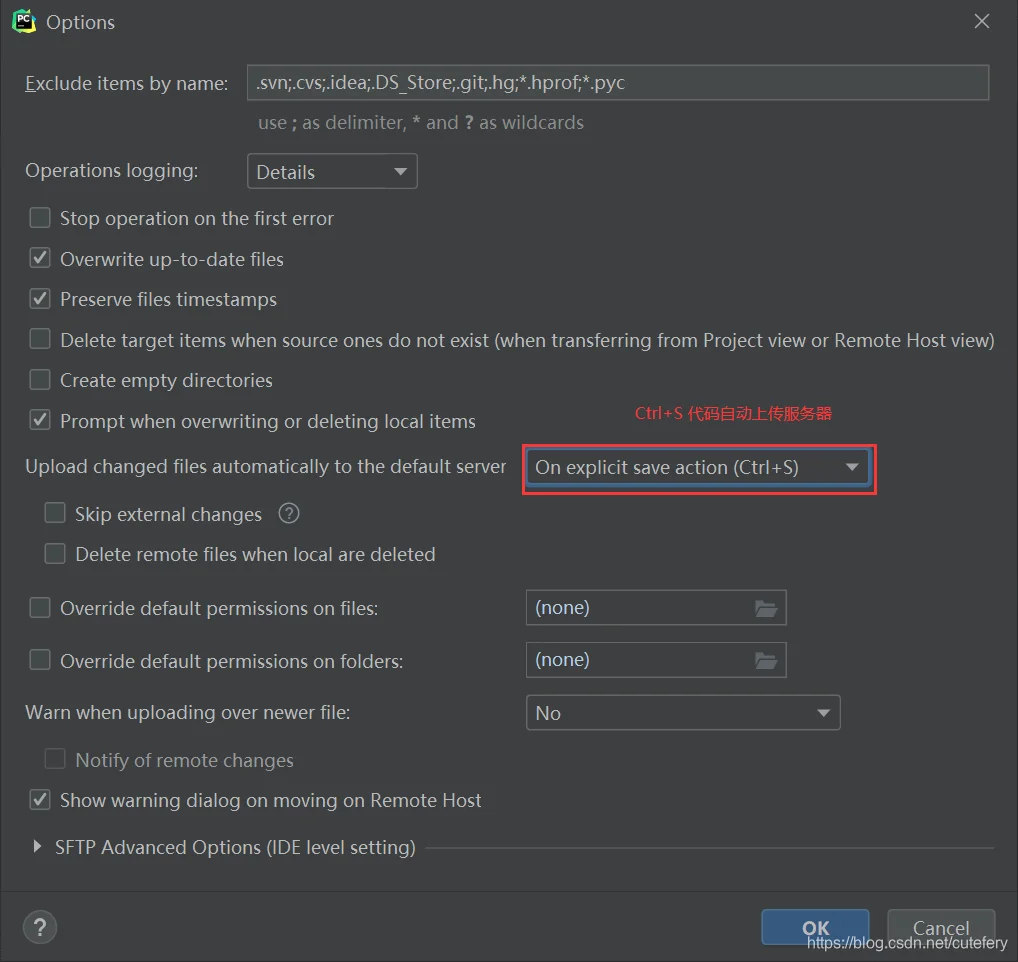
4. 设置 Python Interpreter
vscode
使用 vscode 连接以后,可以将文件直接拖拽传递
报错
我只教一次!vscode remote-ssh 连接失败的基本原理和优雅的解决方案 - 知乎
VSCode 连不上远程服务器问题及解决办法集合_vscode 无法连接远程服务器-CSDN 博客
blog.csdn.net/why1249777255/article/details/134296929
blog.csdn.net/why1249777255/article/details/134296929
到本地删除.ssh 下 known_hosts
shellC:\Users\username\.ssh\补充:如果 known hosts 文件中有其他信息,不要直接删除文件,直接删掉服务器信息即可
首先 kill 掉服务器端的 VS code 服务,然后在服务器端删除 vscode 连接的相关记录
text/home/username/.vscode-server/重新回到 Vscode 连接
还可以尝试把.ssh\ss
其他工具
- scp(linux to linux)
- wget
运维工具
宝塔面板
wget http://download.bt.cn/install/bt-uninstall.sh
sudo chmod +x bt-uninstall.sh
sudo ./bt-uninstall.sh1Panel
curl -sSL https://resource.fit2cloud.com/1panel/package/quick_start.sh -o quick_start.sh && sudo bash quick_start.sh配置镜像加速选择y
使用1pcl命令行工具进行管理,命令行工具 - 1Panel 文档
!!! note "如果使用的是云服务器,需要配置安全组规则" 在安全组当中,选择添加规则
- 目的:`20410/20410`
- 源:`0.0.0.0/0`

然后点保存即可,不需要重启云服务器,保存后自动生效。
显卡相关
import torch
print("PyTorch Version:", torch.__version__)

if torch.cuda.is_available(): # 检查 CUDA 是否可用
    print("CUDA is available.")
    num_gpus = torch.cuda.device_count() # 获取显卡总数
    print(f"Number of GPUs: {num_gpus}")
    if num_gpus >= 1:
        device = torch.device(f"cuda:{num_gpus - 1}") # 指定使用最后一块显卡
        print(f"Using GPU: {torch.cuda.get_device_name(device)}")
        tensor = torch.rand(3, 3).to(device) # 在指定显卡上创建一个简单的张量计算
        print("Tensor on GPU:\n", tensor)
    else:
        print("No GPUs available.")
else:
print("CUDA is not available.")PyTorch Version: 2.4.1+cu121
CUDA is available.
Number of GPUs: 6
Using GPU: NVIDIA GeForce RTX 3090
Tensor on GPU:
tensor([[0.9610, 0.1389, 0.1536],
[0.7481, 0.7573, 0.2097],
[0.2123, 0.6865, 0.0611]], device='cuda:5')查看 GPU
gpustatnvidia-msinvidia-smi -l??? note "各参数含义" - GPU:显卡编号,从 0 开始。- Fan:风扇转速,在 0~100% 之间变动。这个速度是计算机期望的风扇转速,实际情况下如果风扇堵转,可能就不会显示具体转速值。有的设备不会返回转速,因为它不依赖风扇冷却,而是通过其他外设保持低温,比如我们实验室的服务器是常年放在空掉房间里面的。- Name:显卡名,以上都是 Tesla。- Temp:显卡内部的温度,以上分别是 54、49、46、50、39 摄氏度。- Perf:性能状态,从 P0 到 P12,P0 性能最大,P12 最小。- Persistence-M:持续模式的状态开关,持续模式虽然耗能大,但是在新的 GPU 应用启动时,花费的时间更少。以上都是 Off 的状态。- Pwr:能耗表示。- Bus-Id:涉及 GPU 总线的相关信息。- Disp.A:是 Display Active 的意思,表示 GPU 的显示是否初始化。- Memory-Usage:显存的使用率。- GPU-Util:GPU 的利用率。- Compute M.:计算模式。
为什么Volatile GPU-Util列显示第二个卡占用为 0,明明这个卡的内存已经用了。这个深度学习调用有关,实际上这时 GPU 正在等待 CPU 的处理,而 CPU 的处理结果有时候很慢,所以 GPU 在等。可以将num_workers=4或 8 或 16(再多不推荐可能变慢,因为通信需要成本),分配多个子线程,且设置pin_memory=True,直接映射数据到 GPU 的专用内存,减少数据传输时间,提高 GPU 利用率。
查看内存
free -mtasklist查看 CPU
top在命令行输入top就可以实现对服务器进程的监控,此时可以看到多个用户的进程,以及 PID,如果遇到有进程卡在了里面可以采用 kill + PID 的方式结束进程。如下图所示:
htophtop 能够更直观的显示活跃进程,单个进程或多个线程的具体内存 1 和 CPU 的占用情况,并且会报告当前所有服务器用户的内存使用状况,并且有更多的 F-系列的直接命令可供使用。
查看用户
ps -f -p PID号指定 GPU
import os
os.environ["CUDA_VISIBLE_DEVICES"] = "0"config = tf.ConfigProto()
config.gpu_options.per_process_gpu_memory_fraction = 0.9 # 占用 GPU90% 的显存
session = tf.Session(config=config)config = tf.ConfigProto()
config.gpu_options.allow_growth = True
session = tf.Session(config=config)进程管理
查看进程
查看所有进程:
bashps -aux列出所有正在运行的进程。
查看特定用户的进程:
bashps -u username列出特定用户的所有进程。
终止进程
通过 PID 终止进程:
bashkill -9 PID强制终止指定 PID 的进程。
taskkill /PID 进程号 -F -T但是感觉任务管理器更方便一点... 😆
通过进程名终止进程:
bashpkill process_name终止所有匹配指定进程名的进程。
Aliyun
无影云电脑
ECS
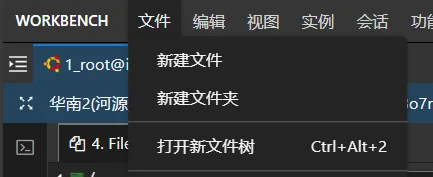
上传文件
使用 workbench,在文件一栏中选择"打开新文件树"
OSS
图床
开发票
个人用户抬头只能是个人